I was able to recover them but they were not restored on my blog (maybe new file names were assigned to them during the recovery??) In any case, I am now faced with the daunting task of uploading them one by one into the original posts, ugh! This may take awhile so please be patient......

Tuesday, September 15, 2015
ATTENTION READERS:
I was able to recover them but they were not restored on my blog (maybe new file names were assigned to them during the recovery??) In any case, I am now faced with the daunting task of uploading them one by one into the original posts, ugh! This may take awhile so please be patient......
Thursday, October 9, 2014
Anything Goes Halloween Swap
Here are my creations for a one on one swap I did with the Altered Tattered and Timeworn yahoo group I belong to:


An altered domino spider web necklace. Inked up with alcohol ink first. Then heat embossed web image with black embossing powder.
Also did this skull tag:

Simply done with Butterscotch Adirondack spray ink sprayed onto a craft mat and swiped up onto the tag to create a general background. Then added Martha Stewart halloween tape to left side. Stamped text with Versafine Ink Pad. The Skull was stamped and heat embossed with black ink onto acetate. I inked up some tissue paper and adhered the image onto it using Glossy Accents. Cut it out and adhered to the tag. Spooky was then stamped and heat embossed onto the tag.
I am entering this tag in the Craft Hoarders Anonymous challenge: Fall and at Simons Says Stamp: Falling
Happy Haunting All!
Saturday, July 20, 2013
Dria's Bday invite: Taco Bar Fiesta

We found some inspiration for how to make them on these two sites:
http://ohhappyday.com/2011/10/mini-pinatas-diy/
http://campfirechic.com/2012/05/mini-pinata-tutorial-happy-cinco-de.html
I took ideas from each post then adjusted them to work for me. First, I hand drew a donkey and photocopied it to make four images on one page. Then, I printed them onto cardstock, stacked another piece of cardstock under it and cut out the images (to ensure exact sets of donkeys). Here is a pic of the images (sorry it is so light)--you get the idea.


I then pulled it up off the wax paper and flipped it over exposing the sticky side of the tape. I placed the two donkeys on each side of the strip as seen here:

I scored the paper strip where there was a crisp point on the donkey (the ears and the pointed feet) and I formed the curve of the donkey as I folded the tape down onto the sides of the donkey. It got tricky when I needed to get a second strip to finish it off, but you get the point. After assembling all of them I realized I needed to add a trap door on the bottom so the candy would fall out when the ribbon was pulled so I had to manually cut a door at the bottom and tape in a ribbon hanging out---to pull open the pinata. I'm sure there would have been a better way to do that had I pre-planned.


I scored the paper strip where there was a crisp point on the donkey (the ears and the pointed feet) and I formed the curve of the donkey as I folded the tape down onto the sides of the donkey. It got tricky when I needed to get a second strip to finish it off, but you get the point. After assembling all of them I realized I needed to add a trap door on the bottom so the candy would fall out when the ribbon was pulled so I had to manually cut a door at the bottom and tape in a ribbon hanging out---to pull open the pinata. I'm sure there would have been a better way to do that had I pre-planned.
I started by gluing tissue paper on the feet, ears and chin (based on the colors of fringe that would be on that body part). To make the fringe I took strips of 1 3/4 inch tissue paper, folded it lengthwise and fringed the unfolded edge. It's hard to explain, but I then unfolded the tissue paper and refolded it so that it made it look like a double layer of fringe and glued rows of that to the pinata. It was easier when Dria and I made an assembly line with her applying glue and me adhering the tissue fringe.


Once we were done with all the fringe we printed and stamped and punched out the 'your invited' labels to be tied around his neck. We printed out our invites as well and cut, rolled and tied them up so that they would fit inside the pinatas.

And here is the finished pinata invitation. I will post the details of the party soon!
Wednesday, February 6, 2013
A post for inspiration today
Although I have been crafting lately, I'm not going to post about that today (but will hopefully some day soon). Today I am feeling a little philosophical so I am just going to post some quotes that I have found inspirational:
Don't Corrupt Yourself: "You are the average of the 5 people you spend the most time with." Jim Rohn
"As we grow up, we realize that is it less important to have lots of friends,
and more important to have real ones." Amanda Mcrae
"Surround yourself with the dreamers and the doers, the believers and the thinkers,
but most of all, surround yourself with those that see the greatness within you, even
when you don't see it yourself." Edmund Lee
"You must constantly ask yourself these questions: Who am I around? What are they doing to me? What have they got me reading? What have they got me saying? Where do they have me going? What do they have me thinking? And most important, What do they have me becoming? Then ask yourself the big question: Is that okay? Your life does not get better by chance, it gets better by change." Jim Rohn
Just a little food for thought......................
Tuesday, October 30, 2012
Halloween Fun!

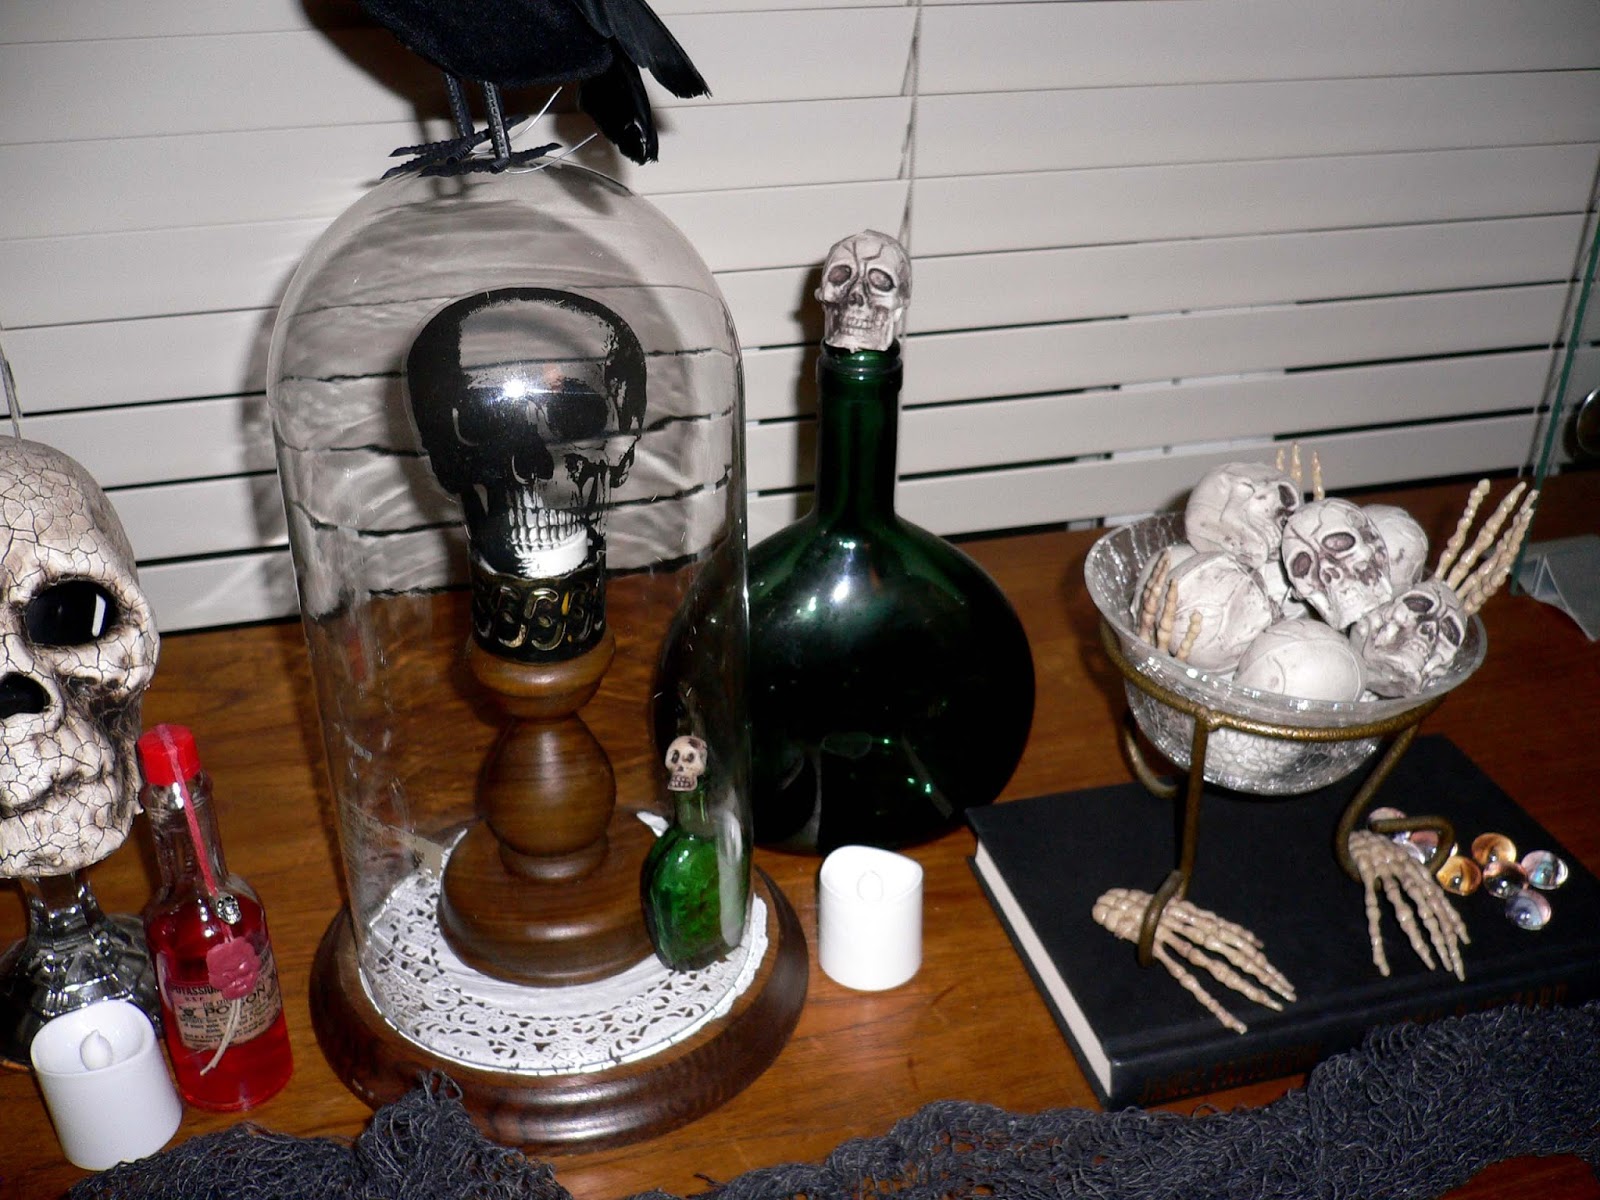
My apothecary spread inspired by Laura Carson over on Artfully Musing. Below I have close-ups and some explanations and details.

Made these eyeballs with eyes cut from magazines and clear flat pebbles from the florist dept. at the craft store. I used Glossy Accent to adhere.

Notice the vase---it was an old clear glass vase painted with Krylon Looking Glass spray paint (really, really cool stuff BTW!!). The black roses with spiders are from the dollar store.

Here is a matchbox book again, inspired by Laura at Artfully Musing blog.

Close up of the drawers of the matchbox book.

Picture of the matchbox book binding.

Bones in one drawers (made from candy bones, inked up).

Contents of two of the other drawers.

This next book I am entering in three Halloween challenges this week: My Time to Craft Challenge , Opus Gluei challenge Blog Hop (see below post) and the Crazy Amigo Challenge. Here is the spine of the book.

The inside of the book: On the left is a picture of a seance---notice Edgar Allen Poe is one of the participants. On the right is an Altoid tin---actually comes like this decorated to look like a Ouija Board (cool, huh??). Wait until you see what I have inside the tin!


Here is a pic of the front of the book.

Here is a better pic of Poe in the Seance.

A close up of the Ouija tin outside.

Here is a pic of the inside, a miniature apothecary cabinet. The tall bottle is filled with gold seed beads. The label was made from Tim Holtz label paper made transparent by transferring it onto packing tape, then adhering it to the bottle. The bottle with the skull (a brad) on the front was painted with the Krylon Looking glass Spray paint. The bottle on the right is filled with cottony fiber inked up with green alcohol ink. That is it for this book.

This is a repurposed Tobasco sauce bottle. Poison label is from Tim Holtz. Used melted red wax and a skull charm to make an impression. If you look closely you can see a tiny skull charm hanging from the twine. Just used red food coloring to color the water inside.
Another thing I painted with the Krylon Looking Glass spray paint---a glass candle stick holder from the Dollar Store.
Hope you liked seeing what I have been working on this October. Glad I was able to post before Halloween!
Happy Haunting All!!!!
Wednesday, October 3, 2012

Sunday, August 12, 2012
Tea Under the Sea Party


Here are some close-up pictures of the treats (inspired from Pinterest):


'Twas a short but sweet celebration!
Dria's Birthday......AGAIN!


We ended up creating our own slip cover from scratch (ad libbing a bit). We made a personalized one for each guest and then hand delivered them---that was half the fun for Dria!


Then, on to personalizing the passports I purchased from Oriental Trading Company. We scanned the girls yearbook pictures to personalize them inside. Once they arrived to the party their tickets were stamped and they were issued their passport. Here you see it with the added passport stickers from the coordinating destinations we visited.

After landing at each destination their passports were stamped with typical site seeing stamps (France---Eiffel tower stamp, Italy---Leaning Tower of Pisa Stamp, Hawaii----flower stamp, China----hanging lantern stamp) and they were given a passport stamp sticker to adhere inside the passport.
To decorate the front door we purchased a foam wreath and wrapped it with old map paper. We created a rosette for the center out of the same paper. We cut out "Bon Voyage" with my Cricut and strung it on the front. We added flags from Oriental Trading Company and hung it outside:

Here's are some pictures of the check-in table and the 'gate':


Each chair at the gate had a 'luggage' bag on it with each girls' name on the luggage tag. The bag was stamped with different travel theme stamps and adorned with a strip of old world map paper. Each bag had a sheet of passport stamp stickers to decorate the bag with while waiting.

I ordered these balloons from Amazon and got the balloon sticks from a local party store. I thought they were a fun touch.

We wrote out a mock Departure Screen on a dry erase board.

We picked up this world map at the thrift store and made the banner using extra flags we had ordered from Oriental Trading Company (we just took the poles off the flags and adhered them to the twine).
Here's a picture of the girls in the 'gate' decorating their 'luggage':


We placed a walkie talkie on the table in the 'gate' and used another walkie in the room to alert the passengers to line up for boarding. The 'airplane' was our stair case (the invite did say to pack a healthy imagination!).
In advance we had found U-Tube videos of airlines speeches to passengers, etc. We saved them to favorites to play on our IPAD. While the girls were on the plane they watched the videos. The first one was a spoof of the safety instructions to the passengers: http://www.youtube.com/watch?v=iO5BFhWdgk4&feature=related .
The second one they watched was the flight attendant doing a rap of the safety instructions:
And the third one, on their way to the lay over in Hawaii, they watched this one of a flash mob on an airplane doing the hula:
Also, we found appropriate music for the IPAD to play at each country.


We moved a walkie talkie to the staircase so that the 'pilot' could alert the passengers of take off and landing.
Once they got off the plane the first time they were each given a charm bracelet with a passport charm on it. They received an souvenir charm at each destination: Italy---globe charm, China---Chinese coin charm, Hawaii----seahorse or starfish charm, and France---Eiffel Tower charm.
First destination: China


While in China the girls first started by using chopsticks to get five mini marshmallows out of their gold take-out boxes. Then, they made Lucky Star origami stars. They even wrote special messages inside some of them to give to others. One of the girls handed me one as she left the party. I opened it up later and it is said, "Thanks for inviting me." What a sweetheart, huh!?!
The girls also received Chinese coins in decorative red Chinese envelopes and Asian themed treats to take home in their 'luggage'. In China we also did a surprise activity. Since Dria and I have been planning her birthday parties together we started a tradition where I add something she doesn't know about as a surprise for her. The surprise activity was a Fortune Teller Fish. If you aren't familiar with these, they are from the 70s. Apparently the heat from you hand causes them to curl up. On the back of the package there is a key to interpret the results of your curling fish. Although it wasn't necessarily a Chinese activity it was red and looked kinda like a Koi fish so I thought it fit pretty well.


The Chinese coin charms they received for their charm bracelets were all different so we passed around a printed out chart of the meanings of each different charm so they could see which was theirs.
Then, it was back to the plane to set off for Italy.


In Italy we had pasta. The girls had a choice of three sauces and could dip their bread in olive oil sprinkled with fresh ground pepper. The drinks were a three tiered/colored drink representing Italy's flag---Red, white and green. They ate and I told them trivia facts about Italy.

Then they boarded the plane again headed for a layover in Hawaii. They were greeted with a Lei and "Aloha" as they departed the plane.


You have to look hard but there is a cocktail umbrella wreath as decoration on the market umbrella pole---gotta love Pinterest!
I don't actually have pictures of the girls in Hawaii. They got Pina Coladas dressed up with grass skirts and coconut tops to drink with pineapple straws in them.

They also got rainbow fruit skewers.
My fruit kabobs were inspired by this pin from Pinterest. Mine looked nearly identical to this, unfortunately, I didn't photograph mine. The link to the original pin is no longer available on Pinterest or I would have added the link to give credit where credit is due............
They played a telephone game with nonsense sentences with Hawaiian words/themes. This is where things got hectic. I looked up at this point and realized the party was over in twenty minutes and they hadn't even gotten to France yet. I asked the girls to come in and go directly to France while I tried to call each mom to tell them to pick up a little later. Because of that I missed out on taking pictures.
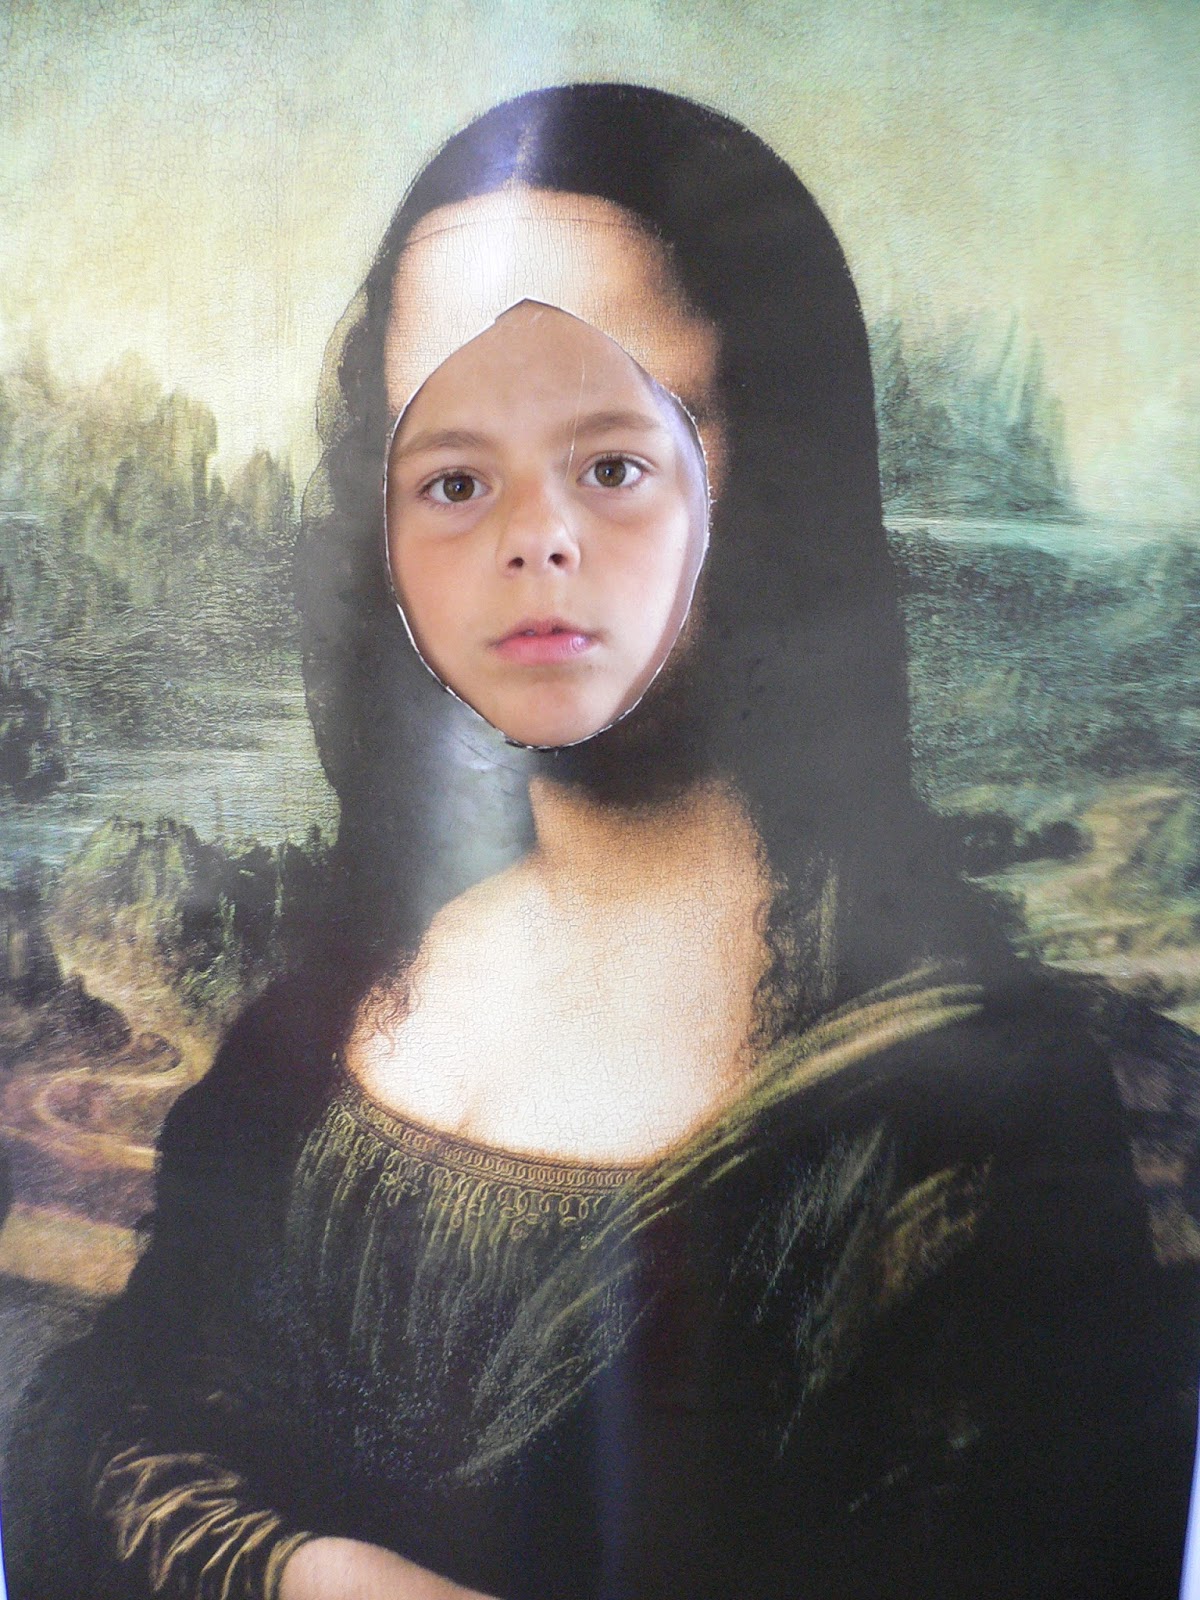
France was a French Cafe and Le Louvre Museum---complete with a picture of Mona herself.


Here is a picture I took before the party. It is missing the cream puffs on the bottom plate and a platter of homemade crepes with chopped fruit and whipped cream. The three tiered platter was made from an idea on Pinterest using old plates and glass candle sticks from the dollar store. The paper Eiffel towers were cut out on my Cricut. The Globe pops were also inspired from Pinterest. If you look closely at Mona you can see her face is cut out. We used this later as a photo prop for the girls. Not all of them wanted to do this activity. I was going to use the picture of each girl as a thank you postcard but since they all didn't want their picture taken with the prop I ended up just printing 13 pictures of Dria as Mona and stamped postcard on the back. Dria wrote her thank yous out on the postcards and we got cute little Aloha postcard postage stamps to put on them.

Here are the waters for France (decorated with cardstock using border punches):

And some pictures of the girls in France with their Hawaiin drinks since I kinda rushed them........


And here is a picture of the Thank You Postcard (Dria as Mona):

And the backside:

And a picture of the completed Charm Bracelet to take home as a party favor (along with their 'luggage' full of treats):

I hope you enjoyed the party as much as we did!
Added notes:
Charms/bracelets/fortune teller fish all from SkyBluePink.com
Starfish and Seahorse charms found on Ebay.com
Globe Balloons from Amazon.com
Hula cup decorations/flags/passports/leis from Oriental Trading Co.
Mona Lisa poster found on Ebay.com
Subscribe to:
Posts (Atom)